このページは以下のURLへ移動しました。This page has moved to the following URL.
Thermal Cam3X V7.0以上の場合は、ESP8266ソースの再インストールが必要です。ソースは以下からダウンロードして下さい。
In case of Thermal Cam3X V7.0 or more, it is necessary to reinstall ESP8266 source. Download the source below.
LEPTON3XYOLO110.ino - Google ドライブ
以下は以前のものです。Below is the old one.
****************************************************************************************
※Thermal Cam3はLEPTON3.5に対応しました。
Arduino IDE(ESP_LEPTON3.5_1220.ino)の入替だけです。
Thermal Cam と Thermal Cam3 のバージョンアップ準備ができたので、インストール方法を公開します。Thermal Cam(又はThermal Cam3)使用の際はArduino IDEをすべて入れ替える必要があります。
Thermal Cam 3 is compatible with LEPTON 3.5,it is necessary to replace Arduino IDE(ESP_LEPTON3.5_1220.ino).See below!!!.
Now we are ready to upgrade for Thermal Cam and Thermal Cam 3, we will release the installation method. When using Thermal Cam (or Thermal Cam3), it is necessary to replace all Arduino IDE.
Dan O さんに現在スイッチサイエンスで販売しているボードや、Thermal Cam・Thermal Cam3の比較動画を作っていただきました。2つのアプリの違いやバージョンアップ内容がよく分かると思います。
システム概要
FLIR LEPTONとiPhoneの動作環境です。
How to use iPhone application

iPhoneアプリ操作方法
Apple アプリストアからW&Tで検索。アプリ名称は
LEPTON1使用の場合 Theamal Cam
LEPTON3及び3.5使用の場合 Theamal Cam3 です。
LEPTONは1か3かでインストール内容が違いますので注意して下さい。
W&TとはWiwao(ハード担当)とTAKEsan(ソフト担当)の合作という意味です。

 サンプル画像はThermal Cam3ですが、Thetmal Camはボタンが赤に変わるだけで操作上の変更点はありません。但しThermal Camはカラーマップの選択数が4色だけになります。
The sample image is Thermal Cam 3, but Thetmal Cam just changes the button to red and there are no operational changes. However, Thermal Cam has only 4 color map selection numbers.

Thermal Cam (LEPTON1用アプリ)の画像。ボタンが赤に変わります
Thermal Cam (for LEPTON1 & 3) がバージョンアップしました。Thermal Cam (for LEPTON 1 & 3) has been upgraded.
内容はこの画像をご覧下さい。Thermal CamはVer2.0.0 Thermal Cam3はVer6.5.0です。
今回はThermal Cam3のみで、バグ修正、スピード向上、WIFIがつながりにくい場所での接続性向上、画像反転機能の追加です。
This time only with Thermal Cam 3, bug fixing, speed improvement, connectivity improvement in places where WIFI is difficult to connect, addition of image inversion function.
Please see this image for the contents.
内容の詳しい説明は最後の「新機能について」を参照。
For the detailed explanation of the contents of version upgrade, see the last "About new functions".
そもそもLEPTONサーモセンサーってなに? What is LEPTON thermosensor in the first place?
このセンサーだけで熱を感知して、画像を再現します。真っ暗闇で何の照明を使わずに画像が再現できます。詳しくはメーカーサイトを御覧ください。
This sensor alone senses heat and shows thermal image. Thermal Images can be seen in the dark without any lighting. Please see the manufacturer site for details.
LEPTON1とLEPTON3はどう違うのか? What is LEPTON 1 different from LEPTON 3?
以前発表したLEPTON1アプリは解像度が80x60。 アプリ上は8倍に画像を補間して約320x240の画像を再現しています。LEPTON3アプリケーションは、もともと持っている解像度160x120を4倍に補間して320x240の動画を再現できます。同じじゃないかって?以下の違いを見てください。ジャギーの出方や背景の詳細感の差が分かるでしょうか?。実際に使うとベールが1枚剥がれた感覚です。今までLEPTON1では見逃していた小さな部分の発見につながります。
有料のThermal Cam3は、解像度が高い分、通信エラーが発生しやすいのですが、アルゴリズムを変えているので、通信が非常に安定しており、結果的にThermal Camより動画スピードが若干上がっています。
The previously announced LEPTON 1 application has a resolution of 80 x 60. The application interpolates the image by 8 times and reproduces the image of about 320x240. The LEPTON 3 application can reproduce 320 x 240 movies by quadruple interpolation of the original 160 x 120 resolution. Is it the same? Please see the difference below. Can you see the difference in detail of Jaggies and background ? . It is a feeling that a veil has peeled off when actually used. Until now LEPTON 1 will lead to the discovery of small parts that you had missed. Thermal Cam 3 is easy to occur error because communication is high rate as the resolution is high, but because the algorithm is changed, the communication is very stable, resulting in slightly higher video speed than Thermal Cam.


LEPTON1でも良さそうな気がしますが、遠景がボケる(詳細ではない)ことと。この補間方法は斜めの線にジャギーが目立ちます。(以前の画像を使用しているので、ボタンが変わっています)
LEPTON3の画像。背景の細かなところまではっきり写っていることがわかります。斜めの線も問題なし。全体がシャープになります。
LEPTON 1 seems to be good, but the distant view is blurred (not the details). In this interpolation method, jaggies are conspicuous on oblique lines. (Because the previous image is used, the button has changed)
Image of LEPTON 3. You can see that the details of the background are clearly shown. There is no problem with oblique lines. The whole is sharp.
背景の丸い物体はこんな形の照明です→
なぜ WROOM02 (ESP8266) を使うのか? Why use WROOM 02 (ESP 8266)?
その消費電力の少なさと価格の安さに尽きます。消費電力はESP32やPi Zero の約半分。基盤を選べば280mAhの極小リポバッテリーでLEPTON3の場合でも1時間以上赤外線動画を発信し続けます。
It consumes less power and lower price. Power consumption is about half of ESP32 and Pi Zero. If a good pcb is chosen, it will continue to transmit infrared video for over 1 hour even in case of LEPTON 3 with 280 mAh mini lipo battery.


新しく開発したドローン向けの比較的大型の基板でも、電池を含めて僅か18gです
このことは、トイドローン搭載を始め色々な用途で使えることを意味します。ただし以前の記事でも紹介したように問題も山積み。普通であればより性能の高いESP32に走りがちですが、ESP8266にこだわり続けました。ESP8266でLEPTON3の画像を しかも、100m前後離れたところからiPhoneで受信できるなんて誰が信じるでしょう!!。
上記写真は、Dobbyに特化したボードで、Wiwaoさんが自力で開発したものです。ESP8266には何も改良を加えていないので当然技適も問題ありません。このボードと今回のソフトの組み合わせで双方100m程度離れている条件で、iPhoneからLEPTON3のほぼノイズがない画像が継続して再現できました。しかも測定した場所はWIFI中継点が20箇所程度と非常に劣悪な環境でした。(下記で実際の動画が確認できます)*1
残念ながら一般のボードでは最大の動画受信距離は50m程度です。今回のアプリはボードを選びませんが、性能と安定性を望むならWiwaoさんの作ったカスタム基盤が必要になります。ESP8266で正常に動画が配信できれば、他のプロセッサやESP32を使うメリットは何もありません。
※Thermal Cam(LEPTON1)でも内容はほとんど変わりません。
This means that you can use it for various purposes, including toy drone. However, as we introduced in previous articles, there are many problems. Although it tends to run to ESP 32 with higher performance if it is normal, I continued to stick to ESP 8266. Who will believe that you can receive images of LEPTON 3 with ESP 8266 and still be able to receive on iPhone from around 100 m away! ! .
The above picture is a board specialized for zerotech Dobby, which Mr. Wiwao developed by himself. Since there is nothing to improve on ESP 8266 naturally, there is no problem with skill. With this combination of this board and software of this time it was able to reproduce images with almost no noise of LEPTON 3 from iPhone under the condition that both are 100 m away.
Moreover, the place where we measured was a very bad environment with WIFI relay point of about 20 places. (Actual video can be confirmed below) * 1
Unfortunately the maximum video reception distance on a general board is around 50 m. This application does not choose a board, but if you want performance and stability, you need a custom pcb made by Wiwao. If you can successfully distribute movies with ESP 8266, there is nothing to benefit from using other processors or ESP32.
※ The contents are almost the same even with Thermal Cam (LEPTON 1).
LEPTON3+Thermal Cam3をDobbyに取り付けて撮影すると.......。When LEPTON 3 + Thermal Cam 3 is attached to Dobby and shot ........
次の動画は、Wiwaoさんが小型ドローンDobbyに今回のシステムを取り付けて、実際に太陽電池メンテナンス用にTestフライトを実施したものです。
The following video is Wiwao's installed this system on a small drone zerotech Dobby and actually conducted a Test flight for solar cell maintenance.

画像には定期的にノイズが入りますが、Dobbyに入っているGPSが悪さをしているようです。現在はiPhoneアプリ側で修正を行い、ほとんどノイズが入らなくなっています。右上の実写画像は、Dobbyの画像データを合成しています。十分実用に耐える解像度なのが、確認できると思います。
※Thermal Cam(LEPTON1)では、ここまで詳細に画像を再現できません。
Thermal Cam3はUDP OSC通信をiPhoneデザリングで実現していますが、周りの妨害電波からほとんど影響を受けません。Thermal Cam 3 conducts UDP OSC communication with iPhone tethering, but it is not hardly affected by surrounding jamming waves.
次の動画はWiFi中継点が20ヶ所程度でパケットに影響の出やすい駅構内で録画していますが、多少フレームレートが落ちる程度で、画像ノイズは全くないことが確認できます。
Although the next movie is recording on the station premises where the WiFi relay point is likely to affect packets at around 20 places, it can be confirmed that there is no image noise at all, as the frame rate goes down slightly.

※Thermal Cam(LEPTON1)でもノイズはほとんどありません。
夜なのにこんな画像が録画できます。Even though it is night, you can record such an image.
人も車も風景も、そして電線も.....。このクオリティー。結構いいかもしれません。
People, cars, landscapes, electric wires ...... This quality. It might be pretty good.

※Thermal Cam(LEPTON1)ではここまで詳細な画像にはなりません。
※ Thermal Cam (LEPTON 1) does not become a detailed image so far.
100m離れた場所での画像です。It is an image at a place 100 m away.
WROOM02(ESP8266)側のWIFI中継点は20箇所。iPhone側は7箇所でした。少しパケット紛失(インジケーター黄色点滅)しているようですが、動画のスピードは問題ありませんでした。この画像の撮影ではWiwaoさんの最新ボードを使っています。
There are 20 WIFI relay points on WROOM 02 (ESP 8266) side. There were 7 places on the iPhone side. It seems that a little packet loss (indicator yellow flashing), but the speed of the video was not a problem. For shooting this image, I use his latest board of Wiwao.

LEPTON3が風に揺れています。ほとんど遅れがないことと、画像のノイズが全くないことが確認できました。この場所はすぐ左側が崖になっている住宅地で、パケットのエラー修正がまともにできていないと、満足に画像が再現できない「魔」の場所です。
LEPTON 3 is swaying in the wind. It was confirmed that there was almost no delay and no image noise. This place is a residential area where the left side is a cliff soon and it is a place of "devil" that can not reproduce images satisfactorily if error correction of packet is not done properly.
※Thermal Cam(LEPTON1)でも内容はほとんど変わりません
※ The contents are almost the same in Thermal Cam (LEPTON 1)
アプリ実行前に...。 Before running the application ....
このアプリは以下の別部品およびソースのインストールが必要です。順番に沿って部品の調達およびソフトのインストールを行ってください。WROOM02のソースコンパイル時はメモリーとCPUスピード設定をそれぞれ80MHz,160MHzに設定が必要です。(Thermal Cam (for LEPTON1)は以前周波数を下げていましたが、V2.0では周波数を上げてコンパイルします)※5.ボード設定は以下の通りとしてください 参照
まずESP8266開発ボード、LEPTON1又はLEPTON3、LEPTONブレイクアウトボードを手に入れてください。
以下必要部品の入手先とLEPTON画像再現までの手順です。
This application requires installation of the following separate parts and source. Please procure parts and install software according to the order. When source compiling WROOM 02, it is necessary to set memory and CPU speed setting to 80 MHz and 160 MHz respectively. (Thermal Cam (for LEPTON 1) had lowered the frequency before, but compiled with increasing frequency at V 2.0) * 5. Please refer to the board settings as follows.
First, get the ESP 8266 development board, LEPTON 1 or LEPTON 3, LEPTON breakout board.
Below is the procedure from where to obtain the required parts to LEPTON image reproduction.


1. ESP8266開発ボードを用意してください。


LEPTON3はSPIとi2C及び3.3V出力端子が必要です。これらの端子が使用できないボードもありますので、購入時は注意してください。
LEPTON 3 requires SPI and i2C and 3.3 V output terminals. Some boards can not use these terminals, so be careful when purchasing.
そして..。お待たせしました。私たちの作ったボードを販売することにしました。
SPIの信号が安定するばかりでなく、WiFiの飛距離が技適範囲内で飛躍的に伸びます!!。汎用にするためにボードの大きさを最適化しました。
And ... Sorry we made you wait. We decided to sell the board we made. In addition to stabilizing the signal of SPI, the distance of WiFi will dramatically increase within the technical range! ! . We optimized board size to make it general purpose.

2. LEPTONを用意してください。 LEPTON3.5はArduinoソースだけを変更します。


日本ではコーンズテクノロジーかDigi-Keyで手に入ります。LEPTON1はシャッター付きをオススメします。
In Japan, you can get it with Cornes Technology or Digi - Key. LEPTON 1 is recommended with a shutter.
もし電子機器を多少かじったことがある人であればFLIR ONEを持っていれば、簡単に取り外すことができます。特殊ドライバ(ヘキサドライバーT5H(センター穴付))が必要で、ビスさえ外せば簡単にLEPTON3を取り外せました。と言うことは、簡単に元に戻せます。(2017年10月6日現在Apple ストアで販売されているFLIR ONEに使われているセンサーはLEPTON1(解像度80X60)。LEPTON3が使われている機種はFLIR ONE Proです。)
If you have kicked the electronic device somewhat, you can easily remove it if you have FLIR ONE. A special driver (Hexa driver T5H (with center hole)) is necessary, you can easily remove LEPTON 3 by removing the screws. To say is easy to undo. (The sensor used for FLIR ONE sold at the Apple store as of October 6, 2017 is LEPTON 1 (resolution 80 X 60), and the model in which LEPTON 3 is used is FLIR ONE Pro.)


LEPTONセンサー自体は完全防水で、衝撃にもかなり強いため悪条件にびくともしませんが、取り外し可能なシャッター部品は壊れやすい欠点があります。取り扱いには十分に注意してください。LEPTONは定期的にシャッターを閉じて画像のキャリブレーションを行っていますが、シャッターが壊れると残像が残るなど、画像に障害が出て来ます。今の所シャッターの交換部品は販売していない様なので、取り扱いには十分注意が必要です。
The LEPTON sensor itself is completely waterproof, and it is quite strong for impact, so it does not bother with adverse conditions, but detachable shutter parts have a breakable disadvantage. Please handle with care. LEPTON regularly closes the shutter and calibrates the image, but if the shutter breaks, afterimages will remain, such as image failure will come out. Currently it seems that we do not sell replacement parts for the shutter, so careful handling is necessary.
3. BREAKOUT BOARDが必要です。 BREAKOUT BOARD is required.


日本ではコーンズテクノロジーかDigi-Keyで手に入ります。
In Japan, you can get it with Cornes Technology or Digi - Key.
4. Arduino IDEをインストールします(Macの場合) Install Arduino IDE (Mac)
Arduino IDE https://www.arduino.cc/en/main/software をインストール
IDEを起動させたら、
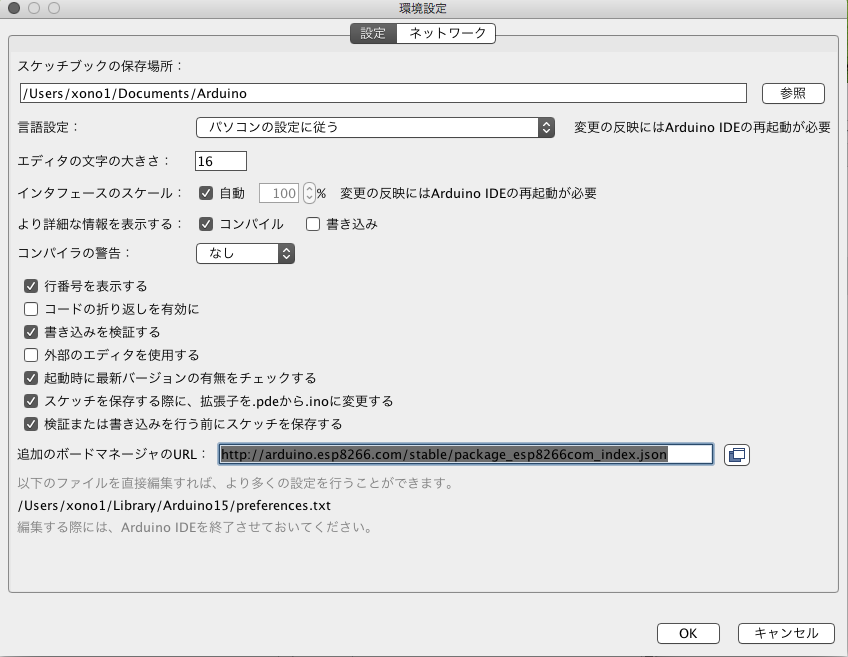
Arduino-->Preferences..
出てきた環境設定ダイアログの下の方「追加ボードマネージャーのURL:」の中に
http://arduino.esp8266.com/stable/package_esp8266com_index.json
を書き込む。
Install Arduino IDE https://www.arduino.cc/en/main/software After starting the IDE,
Arduino-->Preferences..
In the lower part of the setting dialog that came out "in the URL of additional board manager:"
http://arduino.esp8266.com/stable/package_esp8266com_index.json
ツール-->開発ボード-->ボードマネージャー を選択
最後の方にesp8266 by esp8266 Community という項目があります。

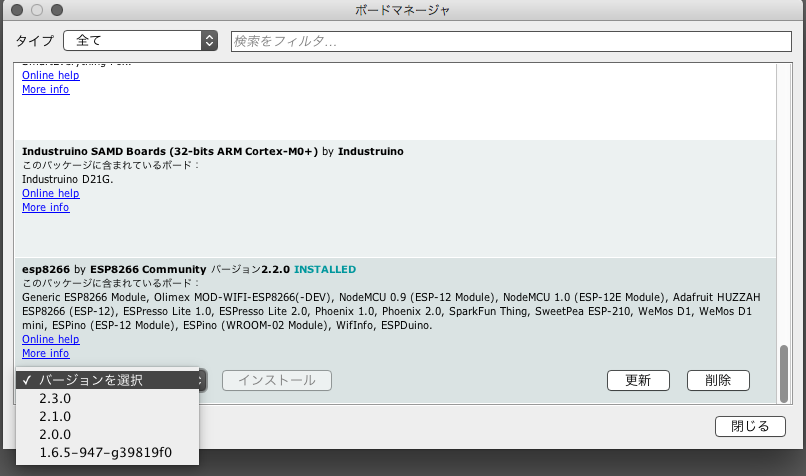
バージョンは必ず2.2.0 を選択してください。(上図はすでに2.2.0を選択してるので選択画面には出て来ていない)すでに 2.3.0を選択している方は 2.2.0にバージョンを落としてください。2.3.0で今回のソースをインストールするとうまく動作しません。
Be sure to select 2.2.0 for the version. (Since the above figure has already selected 2.2.0, it has not appeared on the selection screen.) If you have already selected 2.3.0 please drop the version to 2.2.0. Installing this source in 2.3.0 does not work well.
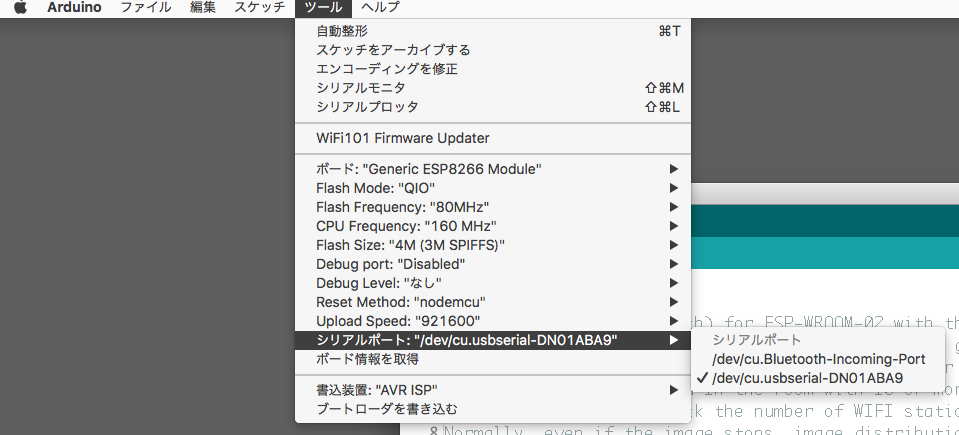
5. ボード設定は以下の通りとしてください。 The board settings should be as follows.
シリアルポートはESP8266を接続すれば表示されますが、Bluetoothでない方を選択します。注意点は、Macの場合ESP8266を何回も抜き差しすると、USBを認識しなくなることです。認識しない場合はMac側のUSBコネクタを変更すると、認識するようになります。MacBookのようにUSBコネクタが2つしかなくて両方認識しなくなったら、再起動……。です。 Flash Frequency=80MHz、CPU Frequency=160MHzであることに注意してください。
The serial port will be displayed if you connect the ESP 8266, but choose the one that is not Bluetooth. The caveat is that if you plug or unplug ESP 8266 multiple times on a Mac, it will not recognize USB. If you do not recognize it, you will recognize it when you change the USB connector on the Mac side. If there are only two USB connectors like a MacBook and both do not recognize, restart ....... is. Please note that Flash Frequency = 80 MHz, CPU Frequency = 160 MHz.


6. OSCライブラリをインストールします。 Install the OSC library.
Arduino IDEの Arduino—>Preferences.. を選択して一番上の スケッチブックの保存場所を確認します。
Select Arduino-> Preferences .. in the Arduino IDE and check the storage location of the top sketchbook.
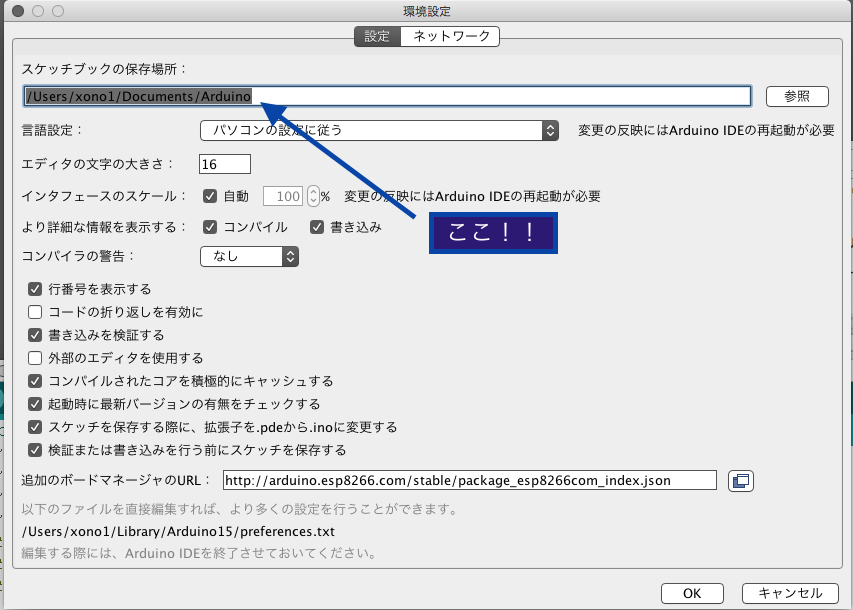
この中に libraries フォルダがあるかどうか確認します
Make sure there is a libraries folder in this

無かったらlibrariesフォルダを作成します。以下のURLを開いて
https://github.com/sandeepmistry/esp8266-OSC
ESP8266のOSCライブラリをダウンロード解凍してlibrariesフォルダに移動させます。
一度Arduino IDEを終了させ、再起動後 スケッチ-->ライブラリをインクルードを選択して 「OSC 」が入っているかどうか確認。
If you do not have it, create a libraries folder. Open the following URL
https://github.com/sandeepmistry/esp8266-OSC
Unzip the OSC library of ESP 8266 and move it to the libraries folder.
Exit the Arduino IDE once, after restarting, select Sketch -> Include Library to check if "OSC" is included.
7. iPhoneを設定します。 Configure iPhone.
iPhone を普通に初期設定するとssidは日本語になります。エラーが起きる可能性がありますので半角英字に修正してください。
設定-->一般-->情報-->名前-->現在のiPhone名称>を選択 で名称を変更します。名称を変更してもiPhone自体の挙動に影響はありません。
When initializing iPhone as usual, ssid becomes Japanese. Please correct it to half-width alphabetical as it may cause an error.
Choose Settings -> General -> Information -> Name -> Current iPhone Name> to change the name. Changing the name does not affect the behavior of the iPhone itself.
8. 今回製作したESP8266Arduino ソースをダウンロードします。Download the ESP 8266 Arduino source produced this time.
https://drive.google.com/drive/folders/0BzqxnYlVMv6uRUtMb2pRXzdsNlU?usp=sharing


LEPTON1_TESTFlight0221.ino LEPTON3_TestFlight_0222.ino
ESP_LEPTON3.5_1220.ino (最新=New)

LEPTON3.5_TestFlight_0628.ino
ESP_LEPTON3.5_1220.ino (最新=New)
お手持ちのLEPTONに合わせてダウンロードしてください。(ファイル名に注意して下さい)Arduino IDEを開いて、今ダウンロードしたファイルをダブルクリック。フォルダの中に入れますか?と聞かれるので、YESを選択。OSCやSPIの安定化、UDPパケット紛失問題の解消、ESP特有のWDTリセットの解決方法をコメントしておきました。ボードを選べば100m以上離れた場所でLEPTONの画像が再現できます。
Please download it according to your LEPTON. (Please note the file name) Open Arduino IDE and double click on the file you downloaded now. Can you put it in the folder? As you are asked, choose YES. We commented on the stabilization of OSC and SPI, the elimination of UDP packet loss problem, and the solution method of WSP reset specific to ESP. If you choose a board, LEPTON images can be reproduced in places more than 100 m away.
9. 今回のiPhoneアプリをダウンロードします。Download this iPhone application.


Ver 2.0.0 Ver 6.5.0
W&Tで検索。LEPTONに合わせてThemal Cam又はThemal Cam3(LEPTON3.5はThemal Cam3そのままでOK)を探します。申し訳有りませんが、資金が底をついてきました。数もあまり出ないと思いますので、Themal Cam3に関して高いとは思いますが、1,000円くらい徴収したいと思います。様々なテストをクリアしているのでアプリはとても安定して動作します。
Search by W & T. Look for Themal Cam or Themal Cam 3 according to LEPTON. I am sorry but funds have bottomed up. I think that it does not come out so much, so I think that it is high with regard to Themal Cam 3, but I would like to collect about 1,000 yen. Since the various tests are cleared, the application works very stably.
10. 今回のソースを開いて一部を修正します。Open this source and fix some.
修正が必要な部分は、以下の3箇所です。
34,35行目付近
#define SSID_X “ABiPhone” //iPhone
#define PASS_X "11111111" //iPhone
ABiPhoneにiPhoneの名称、11111111 に 設定-->モバイルデータ通信-->Wi-Fiのパスワード を調べて パスワードを入力します。
47行目付近
#define LEDpin 16
に自分のボードに合ったLEDのピン番号を入力してください。LEDは特に必要ありませんが、ESP8266の状態がわかるので、点灯すると便利です。サインは以下の通りです。
- LED 長点滅 初期のWiFi接続中の場合点滅。中間でWDTリセットが入った時やWiFi再接続中の場合点滅。
- LED 短点滅 iPhone側のアプリが中断した場合点滅。
- 無点滅 正常にデータを送っている場合。
- 無点滅中一瞬LEDが光る場合 パケットが紛失して、再度同じパケットを送っている時。ピカッピカッが多いときは、周囲の電波状態が悪く連続してパケット修正をしている状態なので、画像のフレームレートが下がります。
GPSをONにすると、周期的に一瞬ピカッと光ります。確実にパケットを紛失してるのですが画像にはさほど影響がないことがわかると思います。BlueToothをONにするとさすがにいっぱい光ってフレームレートが落ちます。
The parts that need to be modified are the following three places.
Near lines 34 and 35
#define SSID_X “ABiPhone” //iPhone
#define PASS_X "11111111" //iPhone
Set the name of iPhone to ABiPhone, set to 11111111 -> Mobile data communication -> Enter the password by checking the Wi - Fi password.
Line 47 (for LEPTON 1) Near line 53 (for LEPTON 3)
#define LEDpin 16
Please enter the pin number of LED matching your board. Although LED is not particularly necessary, it is convenient to light up as you can understand the state of ESP 8266. The signature is as follows.
- LED blinking - when initial WiFi connection is in progress. Blinks when WDT reset is entered in the middle or WiFi reconnection is in progress.
- LED Flash short blink Blinks - when iPhone side application is interrupted.
- No flashing - When sending data normally.
-
When the LED glows instantaneously during blinking - When the packet is lost and is sending the same packet again. When there are a lot of shocks, the frame rate of the image decreases because the ambient radio condition is bad and the packet is being corrected continuously.
11. ESP8266とLEPTON BREAKOUT BOARD を接続します。Connect ESP 8266 and LEPTON BREAKOUT BOARD.
スイッチサイエンスESPrの場合、LEPTONブレイクアウトボードとESP8266の結線は以下の通りです
For switch science ESPr, the connection between LEPTON breakout board and ESP 8266 is as follows

12. WROOM02(ESP8266)ボードにプログラムを転送します。 Transfer the program to WROOM02 (ESP8266) board.
以上設定が終わったらコンパイル、転送します。たまにエラーが出る場合がありますが、その場合は再度転送してください。(USBを認識していない場合が多い)
When compilation and transfer are done, it completes. Although occasionally an error may appear, please transfer again in that case. (USB is not recognized in many cases)
13. いよいよサーモグラフィー開始 The thermography finally starts !!
iPhone7、7plus、 SE、iPad mini4 、Xでの動作確認をしています。一般のiPadでも動くと思いますが、両者ともCPUはA9以上が必要です。iPhone8、8Plus、他のiPadに関してはシュミレーターで動作を確認・調整しています。
インストール作業から1回目の動作確認までは、簡単とは言えませんが、Arduinoに慣れている皆さんにとっては全く問題のない過程です。セキュリティーを保ったまま、2回目以降は3ステップ(LEPTON側スイッチオン-->インターネット共有-->iPhoneアプリ起動)で動いてしまいます。煩わしいWiFi選択やIP、パスワード入力などは全く必要ありません。また、テザリングを使っていても外部とは通信しないので、Thermal Cam3動作に関する通信料金は発生しません。
I am checking the operation with iPhone 7, 7 plus, SE, iPad mini 4, X. I think that it will work on general iPad, but both require A9 or more CPU. For iPhone 8, 8 Plus, and other iPads, the operation is checked and adjusted with a simulator.
It is not easy from installation to first confirmation of operation, but for everyone who is accustomed to Arduino it is a completely problem free process. While keeping security, it moves with 3 steps (LEPTON side switch ON -> Internet share -> iPhone application launch) after the second time. No troublesome WiFi selection, IP, password entry etc are required at all. Also, even if you use tethering, you will not communicate with the outside, so there will be no communication fee for Thermal Cam 3 operation.
皆さんのアイディアで、用途に合わせた素敵なThermal Camケースを作って見てはいかがでしょうか。私は今回Wiwaoさんが試作したボードを利用してレザーケースを3種類作って見ました。
Why do not you make a nice Thermal Cam case according to the application with your idea. I made three kinds of leather cases using the board which was made by Wiwao this time.

###########################################################
新機能について About new features
今回のバージョンアップは、ダイナミックレンジの考え方から説明する必要があります。今回は大きく分けて3つの機能が追加されました。また、新たにiPhone8,8Plus,iPhone X、iPad Pro10.5 inchに対応します。
In this version upgrade, we need to explain from the concept of dynamic range. This time, three functions were added in roughly divided. In addition, it corresponds to iPhone 8, 8 Plus, iPhone X, iPad Pro 10.5 inch anew.
ダイナミックレンジについて About dynamic range
LEPTONは測定温度に応じて14bitの数値を出力しますが、白黒データにすると1ピクセルあたり最大8,192階調にもなります。計測範囲は-273 〜 + 300 ℃( 分 解 能 : 0.05℃ )。現状の通常ディスプレイで表現できるグラデーションは256段階。それに色を付けます。ところが表示装置の制限で、測定可能範囲を256階調にすると非常に荒い画像となることになります。さらに測定する温度範囲はその中のごく一部で、濃淡が出ないために画像が表現できません。回避策は画像として表示するため計測範囲をここで256階調に変換することになります。
LEPTON outputs a 14-bit value according to the measured temperature, but if it is monochrome data it will be up to 8,192 tonal levels per pixel. Measurement range is -273 ~ + 300 ℃ (resolution: 0.05 ℃). There are 256 gradations that can be expressed in the current normal display. I add color to it. However, due to limitations of the display device, if the measurable range is set to 256 tones, it will be a very rough image. Furthermore, the temperature range to be measured is only a part of it, and the image can not be expressed because there is no shade. Since the workaround is displayed as an image, the measurement range will be converted to 256 tones here.

色付けした画像が下図のようになり、Thermal Camの標準画面です。

この方法は問題があって、刻々と変化する温度領域をその都度256等分することになるので、測定場所の移動で、画面毎に色がめまぐるしく変化してしまいます。
Since this method has problems and it will divide the constantly changing temperature range into 256 equal parts each time, as the measurement place moves, the color changes dramatically from screen to screen.

室内のように最高最低温度の差があまり無い場合は、気になりませんが、例えば画面に極端な高温部が部分的に存在する場合、温度差が増しただけ解像度が下がることになるので極端な温度幅になり、室内の階調がほとんど無くなることになります。
If there is not much difference between maximum and minimum temperatures as in the room, you do not mind, for example if the extreme high temperature part is partially present on the screen, since the resolution will decrease as the temperature difference increases It becomes an extreme temperature width, and the gradation of the room almost disappears.


これを防ぐため、この例の場合低温寄りのある範囲で256階調にすれば画像表現できることになります。
調整する方法として、現状の最高最低温度の低温側及び高温側を全体の比率で調整できるようにしたのがダイナミックレンジです。調整範囲外は白又は黒になります。下図は低温側を調整した場合です。
In order to prevent this, in the case of this example, if it is 256 tones in a certain range close to low temperature, it is possible to express the image.
As a method of adjustment, the dynamic range is made to be able to adjust the low temperature side and the high temperature side of the current maximum and minimum temperature by the whole ratio. Outside adjustment range is white or black. The figure below shows when adjusting the low temperature side.


現在の最低最高温度の範囲で、低温側32%を256階調表現している。Max温度はこの場合炎の温度ではなく背景の最高温度となる。高温側を調整した場合はMin温度が変化する。
In the current lowest maximum temperature range, 32% of the low temperature side is expressed in 256 tones. In this case Max temperature is not the temperature of the flame but the maximum temperature of the background. When the high temperature side is adjusted, the Min temperature changes.
結果的に、ある温度帯でLPTONの分解能の限度まで階調を表現できるようになります。これがThermal Camのダイナミックレンジスライダーです。
As a result, gradation can be represented up to the limit of the resolution of LPTON in a certain temperature range. This is the dynamic range slider of Thermal Cam.
新機能 1 New function 1
室内のように測定温度範囲が小さい状況で温度画像を再現したい場合、他の方法で背景色の変化をできるだけ無くする方法はないのでしょうか?。-273〜+300 ℃の計測範囲を例えば室内の最低最高温度(24℃〜34℃とか)に変えて、この間に256階調のカラーマップを適用させる方法で解決できます。測定温度に対応する色が固定されるので画像が安定することになります。
If you want to reproduce a temperature image in a situation where the measurement temperature range is small like indoors, is there no way to eliminate background color change as much as possible using other methods? . It can be solved by changing the measuring range of -273 to + 300 ° C to the minimum room temperature (24 ° C to 34 ° C, for example) in the room, and applying 256 gradation color maps during this period. Since the color corresponding to the measurement temperature is fixed, the image will stabilize.


上記のように最低温度、最高温度を設定してスライドスイッチをONにします。カラーレンジをONにして、Thermal Cam を動かすと画像右上にグレーの点と、今設定した温度範囲が表示されます。
Set the minimum temperature and maximum temperature as described above and turn on the slide switch. When the color range is set to ON and the Thermal Cam is moved, gray points and the set temperature range are displayed at the upper right of the image.

同時に左下の現状最低最高温度表示部分に青と赤の点が現れます。二つの点の範囲が絶対カラーマップの範囲を示します。現状はその範囲でどのあたりを利用しているのか判別できるようにしました。測定した温度帯が刻々と変化しますので、この2つの点も常に動くことになります。カラーマップONで極端な温度が部分的に発生した場合でも、下図のように(ライターの火が画像に入っている)背景色は変化しなくなります。
At the same time, blue and red dots appear in the lowest highest temperature display area at the bottom left. The range of two points indicates the absolute color map range. The current situation has made it possible to judge which area is used within that range. Since the measured temperature zone changes every moment, these two points will also move at all times. By doing this, even if extreme temperatures are partially generated, the background color will not change as shown below (the lighter's fire is in the image).

赤と青の点の範囲と現在のカラーマップがうまく動いていることがわかると思います。
You can see that the range of red and blue points and the current color map are moving well.
この新機能は、現状カラーマップが標準カラーマップのごく一部の範囲となった場合階調が著しく失われますので注意が必要です。
Please note that this new function will cause the gradation to be significantly lost if the current color map becomes a small part of the standard color map.
新機能 2 New function 2
設定でSide View をON。特に確認したい温度領域 Target temp で温度を指定します。
この設定で、画面右側にサブビューが表示され、ターゲット測定温度は緑色で表示されます。
Set Side View on setting. Specify the temperature with the temperature range Target temp you want to check.With this setting, a subview is displayed on the right side of the screen and the target measurement temperature is displayed in green.


この例のように最高温度最低温度域、設定温度域が即座に確認できます。測定域が現在の最低温度より低いときは、当然ですが緑表示されないのでご注意下さい。
As in this example, the maximum temperature minimum temperature range, set temperature range can be confirmed immediately. Please note that when the measurement area is lower than the current minimum temperature, green display will not be made.
新機能 3 New function 3
ESP8266はWIFI無線電波帯域が2.4GHzです。それが他のBluetoothやWiFi機器と干渉する場合があります。こうなった場合、ESP8266の電波を切断出来るようにしました。パニックになった場合iPhoneをシェイクするとESP8266のWiFiは約20秒間完全に止まり、電波干渉は無くなります。ドローンなどに取り付ける場合の墜落リスクが減ることになります。
ESP 8266 has a WIFI radio frequency band of 2.4 GHz. It may interfere with other Bluetooth or WiFi devices. In this case, we made it possible to cut off the wifi of ESP 8266. In this case, shaking the iPhone, the WiFi of ESP 8266 will stop completely for about 20 seconds. Both radio interference disappear during this time. The risk of crashing when attaching to drone etc. will be reduced.


設定で Shake をONにします。シェイクすると復旧するまでの秒読みが始まります。
Set Shake to ON by setting. Shaking will start the countdown until it recovers.
LEPTONの温度計測に関する全般的な注意点は、 Overall note on temperature measurement of LEPTON
- LEPTONは温度計測が安定するまで多少の時間が必要です
- 作成したアプリは対象熱源の放射率を考慮していません
- 現在販売しているLEPTON1及びLEPTON3は温度測定の保証はしていません
- LEPTON needs some time until the temperature measurement stabilizes
- The created application does not consider the emissivity of the target heat source
- Temperature measurement is not guaranteed for LEPTON 1 and LEPTON 3 which are currently on sale
以上のことから場面や環境で測定温度に誤差があることをご理解下さい。
Please understand that there is an error in the measured temperature in the scene or environment from the above.
* 1: There are few noises depending on the distance and the surrounding conditions, but the frame rate drops.
*1:距離、周囲の条件により、ノイズはほとんどありませんがフレームレートは落ちます。
