ボクの実力ではもうできないと思ってました。I thought that I can no do this.
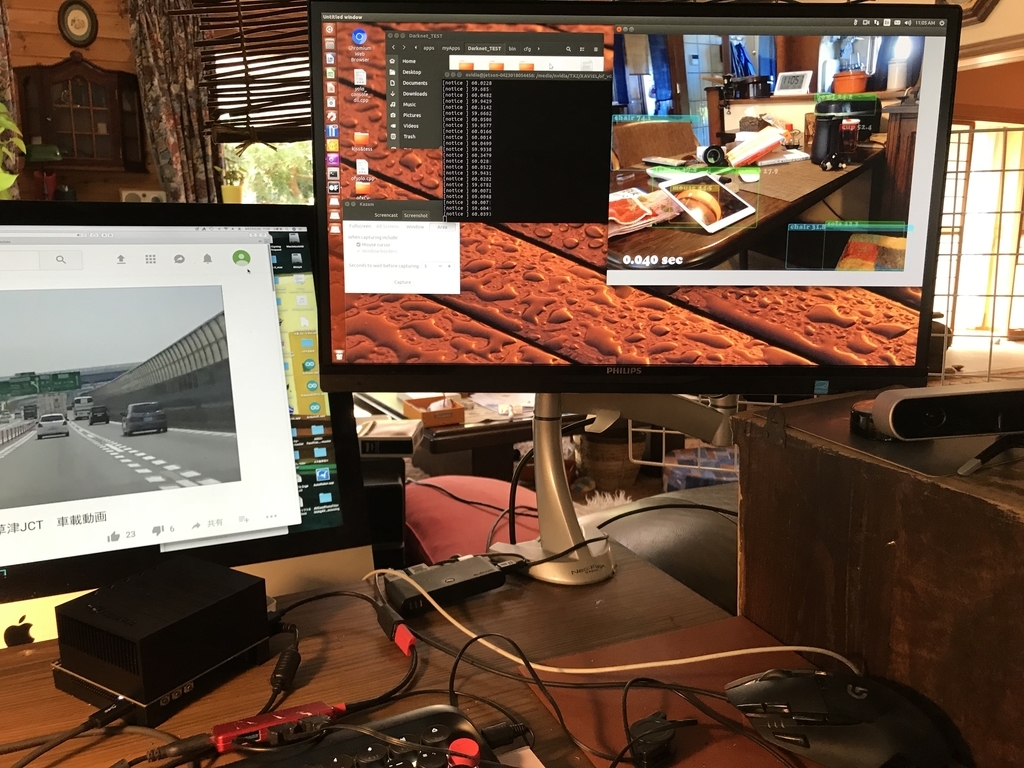
今回の完成形。Zavierにインストールしたopenframeworksでyoloを実行させているところです。This completion form. I am running yolo with openframeworks installed in Xavier.
YOLOをopenFrameworks(以下OF)で実行できるofxDarknetというaddonが存在します。ただしWindowsとMacのみ。他にLinux用のofxDarknetもあるのですが、母艦でもXavierでも上手くインストールできません。1週間以上トライしてなんとか動かしたらimagenetでも10fpsまで行きませんでした。しかも肝心のYOLOが動かない。いろいろやってるうちに分かったのは、このaddonはTinyYOLOしか動かない(yolo9000も動くらしいが9000クラスもあるため。スピード的にリアルタイムは不可能)ことが判明。そして、GPU演算に16bit浮動小数点が指定できないので、Xavierには全く向かないことが分かってきました。こちらはYOLOを利用して、何か作りたいわけですから、これジャーなーと言うことで、10日目で諦めました。でもDarknetのファイル構成など少しずつ分かってきたので、いくらかスキルアップにはなった模様。 OFにOpenCV3.4をリンクして、これに入っているYOLOを使う方法もありますが、Darknetと比較すればかなり遅くなると思われます。
There is an addon called ofxDarknet that can run YOLO with openFrameworks (OF) below. However, Windows and Mac only. There is also ofxDarknet for Linux, but you can not install it successfully on both the mother ship and Xavier. I tried it for more than a week and managed somehow but imagenet did not go up to 10 fps. Moreover, the important YOLO does not work. While I was doing various things, this addon works only TinyYOLO (yolo 9000 also works, but because there are 9000 classes, it is impossible to realtime speed). And since we can not specify 16 bit floating point for GPU operation, it is not suitable for Xavier at all. Because I want to make something using YOLO, I gave up on the tenth day alter all. But as I learned about Darknet's file structure little more than before, it seems that I got some skill up. There is a way to link OpenCV 3.4 to OF and use YOLO contained in it, but it seems to be considerably slow compared to Darknet.
さーて、どうするか?。Well, what do I do? .
以前TX1でJetson InferrenceをOFに組み込んだときのことを思い出しました。一度ビルドした標準のDarknet(前回紹介したやつ)のコンパイル済みライブラリ(.soファイル=Shared Object)を取り込む方法。これだと多少手間は必要ですが、本来のスピードと性能は維持されることになります。標準Darknetでは16bit浮動小数点指定と、.soファイルが作れませんが、これだと作れます。ぜったいにできる!!
I remembered what happened when Jetson Inferrence was incorporated into OF before on TX 1.
How to import the compiled library (.so File =Shared Object) of the standard Darknet (introduced last time) that was built once before. Although this requires some trouble, the original speed and performance will be maintained. Standard Darknet does not make 16 bit floating point specification and .so file, but it can be created with this. You can do it by all means! !
ヒントはダウンロードしたDarknetフォルダにあるMakefileと、2つのyoloサンプルsrc/console_dll.cpp、src/yolo_v2_class.hppにありました。これらのファイル中でOpenCVに関連する部分を取り除いていくと、画像認識に必要な関数は4つだけである事が分かります。つまりweightとcfg、クラス名ファイルを読み込む3つの関数。それに画像と、認識基準係数を指定して見つかっただけのバウンディングボックス座標とクラス番号等が戻ってくる関数です。OFの動画データをDarknet画像入力データimage_tに変換する部分が最大の山で、今回OpenCVを使っているのはこの部分だけとなります。cv::Mat ---> image_t 変換に作者の書いたソースを使いましたが、OFのデータからわざわざcv::Matに変換しなくても(つまりOpenCVを使わなくても)良さそうな感じ。余計なことはこのくらいにして、
Hints were found in the Makefile in the downloaded Darknet folder and two yolo samples src / console_dll.cpp, src / yolo_v2_class.hpp. If you remove the part related to OpenCV in these files, you can see that there are only 4 functions necessary for image recognition. That is, weight and cfg, 3 functions to read the class name file.
And a function that returns images and bounding box coordinates just found by specifying the recognition criterion coefficient and class numbers . The big issue to convert OF moves data into Darknet image input data image_t, and this time it is only this part that uses OpenCV. I used the source written by the author for cv :: Mat ---> image_t transformation, but it does not bother to convert from OF data to cv :: Mat (that is, without using OpenCV?) feel good . Do not care,
横取り作戦開始。 Mission start.
Xavierの場合、内部eMMCは容量が少ないので、必ず外付けHDDかSSDまたは内蔵SDカードでインストール作業を行う必要があります。
まず、上記サイトからダウンロードした圧縮ファイルを展開して、フォルダ名をとりあえずdarknet-XXXとし、Darknetをビルドします。ソースを見るとOpenCVを使ってるのは画像処理部分ですが、OpenCVに関わる余計なライブラリの指定や、OFと競合が発生する可能性(ofxDarknetの問題点)があります。OFにはofxCVというOpenCVのaddonがあるのでこれが利用できます。なのでOpenCVを使わない設定にすることが必要。darknet-XXXに入り、Makefileの中身を以下のように修正します。で、make !!
In the case of Xavier, the capacity of the internal eMMC is small, so you must install it with an external HDD, SSD or internal SD card.
First, unzip the compressed file downloaded from the above site, set the folder name as darknet - XXX for the time, and build Darknet. Looking at the source, using OpenCV is the image processing part, but there is the possibility of specifying extra libraries related to OpenCV and possibility of conflict with OF (the problem of ofxDarknet). There is an OpenCV addon named ofxCV in OF, so we can use it. So it is necessary to make settings that do not use OpenCV. Enter darknet - XXX, and modify the contents of Makefile as follows. So, make !!
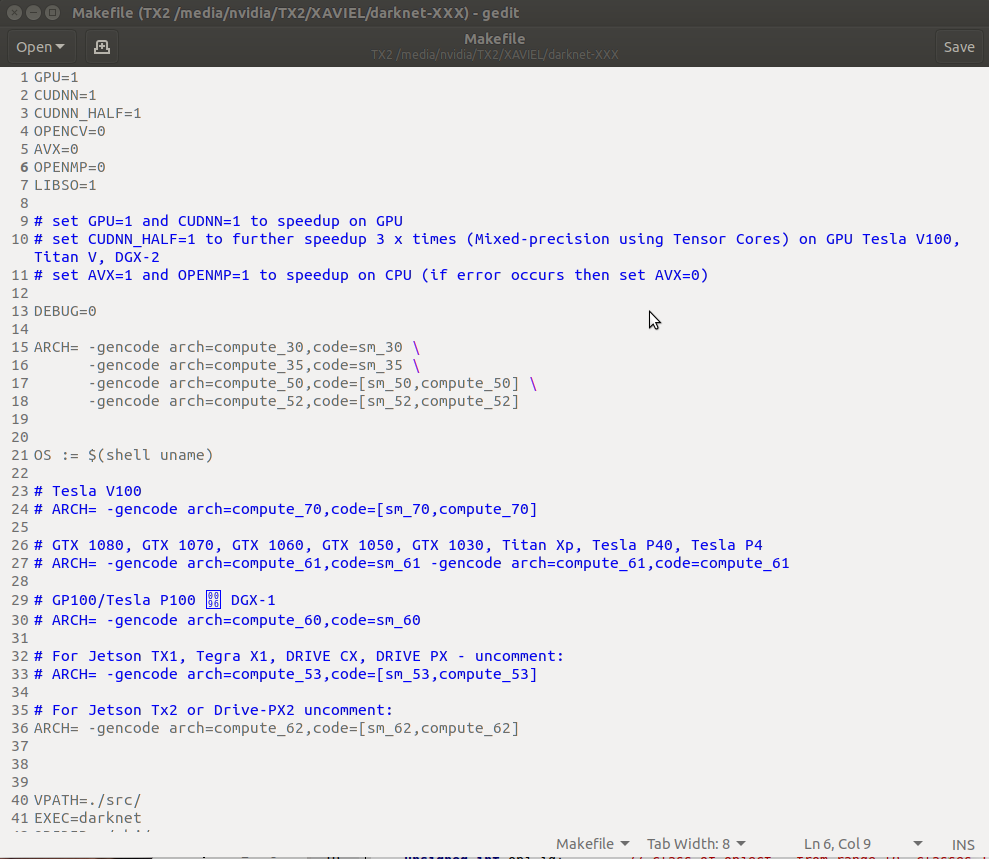
1〜7行目まで上のように修正、36行目ARCのコメントを外し、数値3カ所を修正Xabierは62、TX2は61にします Modify 1 ~ 7 lines as above, remove comment on line 36 ARC, fix 3 numerical values Xabier will be 62, TX 2 will be 61
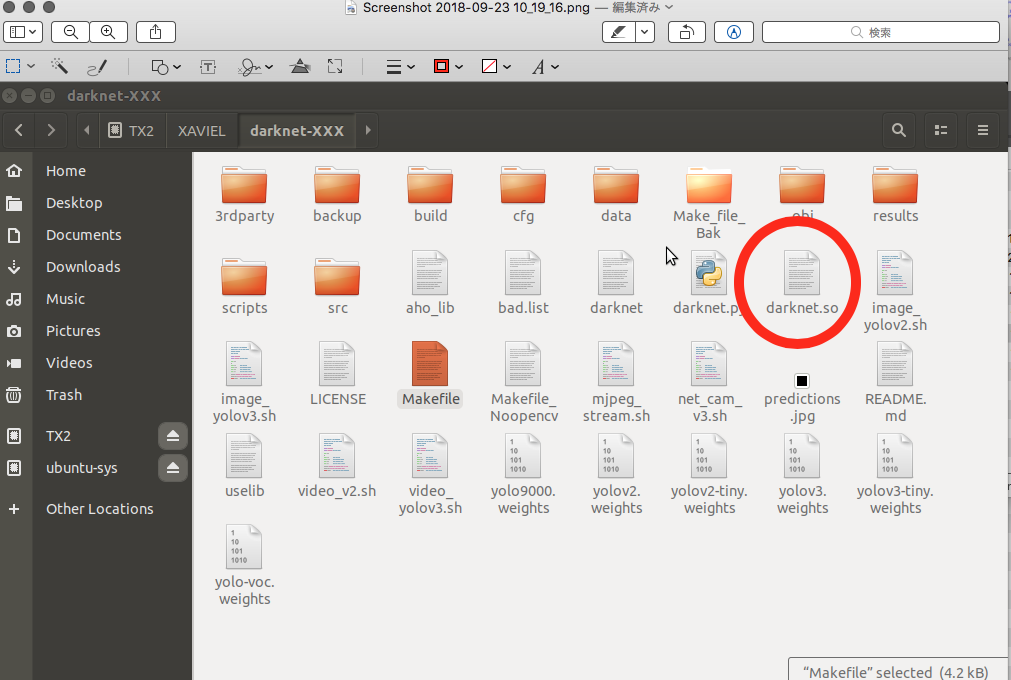
最終的にdarknet.soが出来ていることを確認します。今回は/usr等に移動せず、この場所のまま利用することにします。
Make sure that darknet.so is finally created. I will not move to / usr etc this time and will use this place as it is.
openFrameworks0.10.0をインストール(以下記事参照)
ofxCV addonをインストール Install ofxCV addon
https://github.com/kylemcdonald/ofxCv/
プロジェクトフォルダを作成 Create project folder
of/app/myapp/enptyExample を同じ場所にコピーしてここではDarknet_TESTとしました。
I copied of / app / myapp / enptyExample to the same place and set it here as Darknet_TEST.
addons .makeファイルを作成 Create addons .make file
Darknet_TESTに入り、nanoとかで
ofxCv
ofxOpenCv
と書いて保存 します。
Go into Darknet_TEST using nano editor or so.
ofxCv
ofxOpenCv
Write and save.
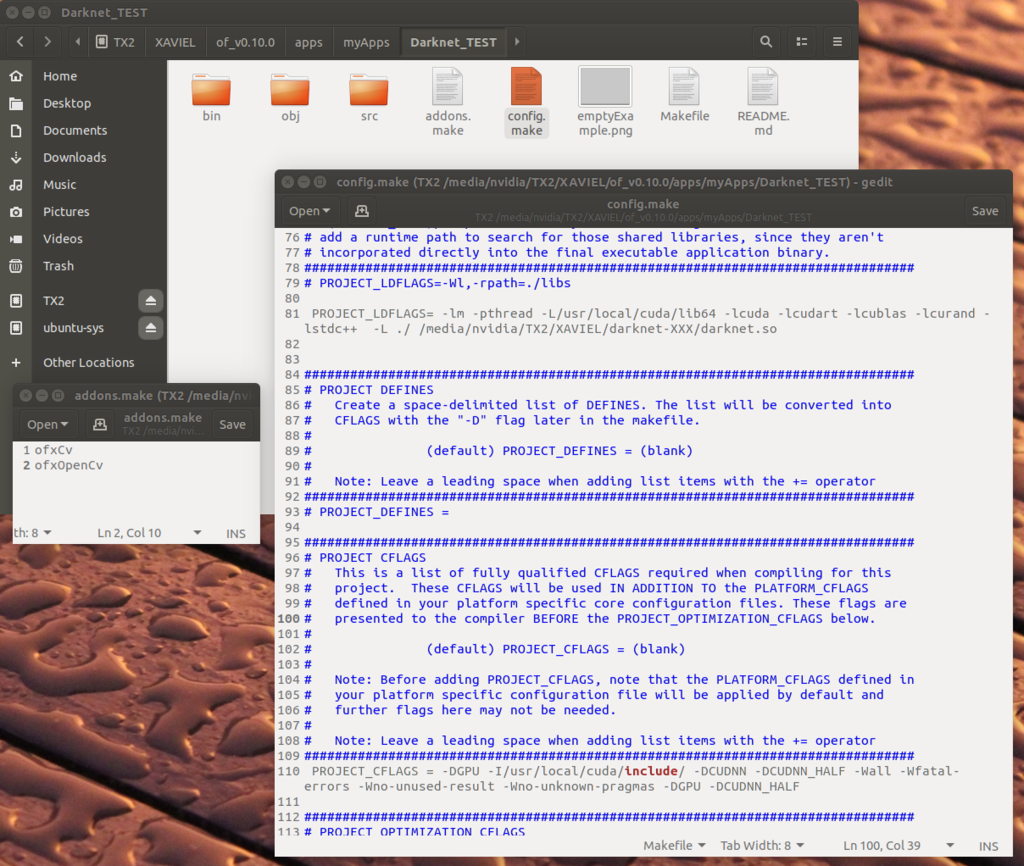
config.makeファイルを修正 Fixed config.make file
上図のように81行目付近と110行目付近(書き込みはどこでも良いのですが)2カ所付け足します。
以下2行です。
PROJECT_LDFLAGS= -lm -pthread -L/usr/local/cuda/lib64 -lcuda -lcudart -lcublas -lcurand -lstdc++ -L ./ /media/nvidia/TX2/XAVIEL/darknet-XXX/darknet.so
※SOファイルの場所は自分の環境に合わせて下さい。
PROJECT_CFLAGS = -DGPU -I/usr/local/cuda/include/ -DCUDNN -DCUDNN_HALF -Wall -Wfatal-errors -Wno-unused-result -Wno-unknown-pragmas -DGPU -DCUDNN_HALF
As shown in the above figure, we add two places near the 81st line and the 110th line (writing is OK anywhere).
It is two lines below.
PROJECT_LDFLAGS = -lm -pthread - L / usr / local / cuda / lib64 - lcuda - lcudart - lcublas - lcurand - lstdc ++ - L. / /Media/nvidia/TX 2 / XAVIEL / darknet - XXX / darknet.so
※ Please match the SO file location to your own environment.
PROJECT_CFLAGS = - DGPU - I / usr / local / cuda / include / - DCUDNN - DCUDNN - HALF - Wall - Wfatal - errors - Wno - unused - result - Wno - unknown - pragmas - DGPU - DCUDNN - HALF
srcフォルダの中にリンクフォルダを作る Create link folder in src folder
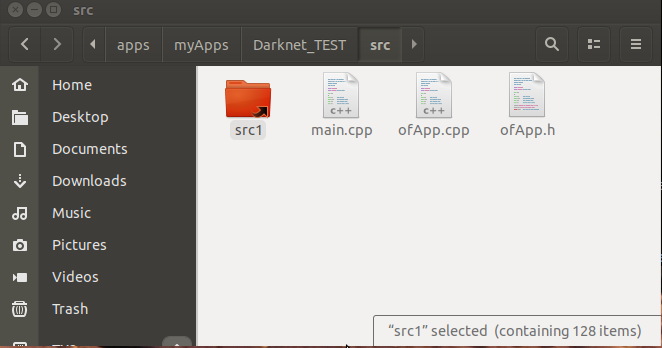
Darknet-TEST/src にリンクファイルを作ります。今回は下図のようにsrc1としました。
リンク先はDarknetフォルダにあるsrcフォルダです。
Create a link file in Darknet-TEST / src. This time it is src1 as shown below. The link destination is the src folder in the Darknet folder.
binフォルダの中にデータを追加 Add data to bin folder
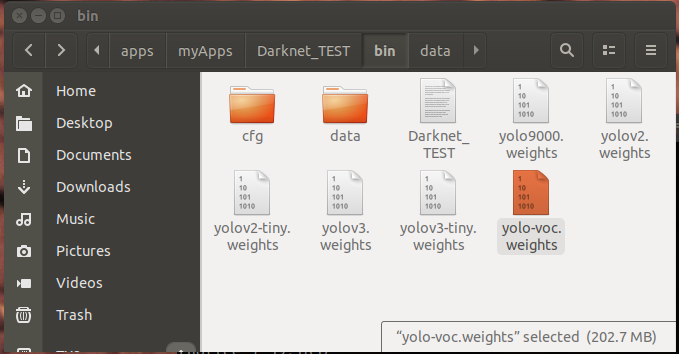
darknet-XXX/cfg darknet-XXX/data の2つのフォルダをコピー(Darknetフォルダにあるcfgとdataフォルダです)
さらにweightファイルをダウンロードしてコピーします。今回はyolov2.weightsとyolov3.weightsの2つを入れておけば良いと思います。ダウンロード方法は上記Darknet ホームページに書いてあります。(確かDarknetインストール時に自動でダウンロードされたような....)
また、dataフォルダの中にcooperBlac.ttfフォントファイルをコピーしておきます。(of/examples/graphics/fontShapesExample/bin/dataに入ってる)
最終的にbinの中身は以下のようになります。余計なweightsファイルが入ってますが気にしない。
Copy two folders darknet-XXX / cfg darknet-XXX / data (cfg and data folder in the Darknet folder)
Download the weight file and copy it. In this time I think that it is good to put in two of yolov2.weights and yolov3.weights. The download method is written on the above Darknet homepage. (It seems like it was automatically downloaded at Darknet installation ....)
Also copy cooperBlac.ttf font file into the data folder. (In of/examples/graphics/fontShapesExample/bin/data)
Eventually the contents of the bin will be as follows. There is an extra weights file but not mind.
srcの中にプログラムを入れる Put the program in src
以下よりmain.cpp、ofApp.h、ofApp.cppを上書きして下さい。ソースは雑ですがご勘弁を....。
Overwrite main.cpp, ofApp.h, ofApp.cpp from below. The source is sloppy but I am sorry ....
以下 main.cpph
#include "ofMain.h"
#include "ofApp.h"

//========================================================================
int main( ){

	ofSetupOpenGL(1024,768, OF_WINDOW);			// <-------- setup the GL context

	// this kicks off the running of my app
	// can be OF_WINDOW or OF_FULLSCREEN
	// pass in width and height too:
	ofRunApp( new ofApp());

}
以下 ofApp.h
#pragma once

#include "ofMain.h"
#include "ofxCv.h"

class ofApp : public ofBaseApp{
	public:
		void setup();
		void update();
		void draw();

		void keyPressed(int key);
		void keyReleased(int key);
		void mouseMoved(int x, int y);
		void mouseDragged(int x, int y, int button);
		void mousePressed(int x, int y, int button);
		void mouseReleased(int x, int y, int button);
		void mouseEntered(int x, int y);
		void mouseExited(int x, int y);
		void windowResized(int w, int h);
		void dragEvent(ofDragInfo dragInfo);
		void gotMessage(ofMessage msg);

		ofVideoGrabber video;
		ofImage img;
};
以下 ofApp.cpp
#include "ofApp.h"
#include "src1/yolo_v2_class.hpp"    // imported functions from DLL

std::string  names_file = 	"data/coco.names";
std::string  cfg_file = 	"cfg/yolov2.cfg";
std::string  weights_file = "yolov2.weights";

float const thresh = 0.20;

cv::Mat 		mat;
ofTrueTypeFont cop20,cop50;
Detector detector(cfg_file, weights_file);
std::vector result_vec ;
float ttt,ttt1;  //Time
image_t xxx;
std::vector objects_names_from_file(std::string const filename) {
    std::ifstream file(filename);
    std::vector file_lines;
    if (!file.is_open()) return file_lines;
    for(std::string line; getline(file, line);) file_lines.push_back(line);
    std::cout << "object names loaded \n";
    return file_lines;
}

auto obj_names = objects_names_from_file(names_file);

void show_console_result(std::vector const result_vec, std::vector const obj_names) {
    for (auto &i : result_vec) {
        if (obj_names.size() > i.obj_id)
			ofNoFill();
			ofSetLineWidth(3);

			//Color Set!!
			int const colors[6][3] = { { 1,0,1 },{ 0,0,1 },{ 0,1,1 },{ 0,1,0 },{ 1,1,0 },{ 1,0,0 } };
			int const offset = i.obj_id * 123457 % 6;
			int const color_scale = 150 + (i.obj_id * 123457) % 100;
			ofSetColor(colors[offset][0]*color_scale, colors[offset][1]*color_scale, colors[offset][2]*color_scale,80);
			ofDrawRectRounded(i.x,i.y,i.w,i.h,5);
			//Mozi Draw!!
			string ss;
			ss=" "+ obj_names[i.obj_id]+" "+ofToString(i.prob*100,1);
			ofFill();
			ofDrawRectangle(i.x,i.y,i.w,20);
			ofSetColor(255,255,255,95);
			cop20.drawString(ss, i.x,i.y+15);
    }
}
static image_t make_empty_image(int w, int h, int c)
    {
        image_t out;
        out.data = 0;
        out.h = h;
        out.w = w;
        out.c = c;
        return out;
    }
static image_t make_image_custom(int w, int h, int c)
    {
        image_t out = make_empty_image(w, h, c);
        out.data = (float *)calloc(h*w*c, sizeof(float));
        return out;
    }
static image_t ipl_to_image(IplImage* src)
    {
        unsigned char *data = (unsigned char *)src->imageData;
        int h = src->height;
        int w = src->width;
        int c = src->nChannels;
        int step = src->widthStep;
        image_t out = make_image_custom(w, h, c);
        int count = 0;

        for (int k = 0; k < c; ++k) {
            for (int i = 0; i < h; ++i) {
                int i_step = i*step;
                for (int j = 0; j < w; ++j) {
                    out.data[count++] = data[i_step + j*c + k] / 255.;
                }
            }
        }
        return out;
    }

void detect_x(image_t x)
{
ttt=ofGetElapsedTimef();
	    result_vec = detector.detect(x,thresh,false);
ttt=ofGetElapsedTimef()-ttt;
		ttt1=ttt;
}
//--------------------------------------------------------------
//  DetectNet部分をマルチスレッドにする。
class Detect_x: public ofThread {
public:

	void threadedFunction(){
		ok=false;
		detect_x(xxx);
		ok=true;
	}
	bool ok;
};
Detect_x Found_X;
//--------------------------------------------------------------
void ofApp::setup(){

    cop20.load("cooperBlack.ttf",15,true,true,true);
    cop50.load("cooperBlack.ttf",30,true,true,true);
    img.allocate(960,720,OF_IMAGE_COLOR);

    video.setDeviceID( 0 );
	video.setup(960,720,OF_PIXELS_RGBA);
	Found_X.ok=true;
}
//--------------------------------------------------------------
void ofApp::update(){
ofLog() << ofGetFrameRate();
	video.update();
	if(video.isFrameNew()==true){
		img.setFromPixels(video.getPixels().getData(),video.getWidth(),video.getHeight(),OF_IMAGE_COLOR);
		mat=ofxCv::toCv(img);
		if (Found_X.ok){
            cv::Mat imgx;
			cv::cvtColor(mat, imgx, cv::COLOR_RGB2BGR);
			std::shared_ptr image_ptr(new image_t, [](image_t *imgx) { detector.free_image(*imgx); delete imgx; });
			std::shared_ptr ipl_small = std::make_shared(imgx);
			*image_ptr = ipl_to_image(ipl_small.get());
			xxx=*image_ptr;
        if (Found_X.ok){
			Found_X.ok=false;
			Found_X.startThread();
	    }
    }
 }

}
//--------------------------------------------------------------
void ofApp::draw(){
	ofSetColor(255);
    video.draw( 0, 0 );

    Found_X.lock();
    show_console_result(result_vec, obj_names);
    Found_X.unlock();

    string ss1;
    ss1 =ofToString(ttt1,3)+ " sec";
    ofSetColor(255);
    cop50.drawString(ss1, 50,700);
}
//--------------------------------------------------------------
void ofApp::keyPressed(int key){
}
//--------------------------------------------------------------
void ofApp::keyReleased(int key){
}
//--------------------------------------------------------------
void ofApp::mouseMoved(int x, int y){
}
//--------------------------------------------------------------
void ofApp::mouseDragged(int x, int y, int button){
}
//--------------------------------------------------------------
void ofApp::mousePressed(int x, int y, int button){
}
//--------------------------------------------------------------
void ofApp::mouseReleased(int x, int y, int button){
}
//--------------------------------------------------------------
void ofApp::mouseEntered(int x, int y){
}
//--------------------------------------------------------------
void ofApp::mouseExited(int x, int y){
}
//--------------------------------------------------------------
void ofApp::windowResized(int w, int h){
}
//--------------------------------------------------------------
void ofApp::gotMessage(ofMessage msg){
}
//--------------------------------------------------------------
void ofApp::dragEvent(ofDragInfo dragInfo){
}
bin/cfg/yolov2.cfgを修正 Fix bin/cfg/yolov2.cfg
bin/yolov3.weightを使用する場合はyolov3.cfgの同じ箇所を修正
最初の方を以下のように変更
[net]
# Testing
#batch=1 コメントを入れる
#subdivisions=1 コメントを入れる
# Training
batch=64 コメントを外す
subdivisions=8 コメントを外す
width=608 608に変更 スピード重視の場合は416(32の倍数なら動く)
height=608 608に変更 スピード重視の場合は416(32の倍数なら動く)
channels=3
Fix bin/cfg/yolov2.cfg
When using bin/yolov3.weight fix the same place in yolov3.cfg
Change the first one as follows
[net]
# Testing
# batch = 1 Add comment
# subdivisions = 1 Add comments
# Training
batch = 64 Remove comments
subdivisions = 8 Remove comments
width = 608 Changed to 608 for better speed it is 416 (it works if it is a multiple of 32)
height = 608 Changed to 608 for better speed it is 416 (it works if it is a multiple of 32)
channels = 3
ビルド&実行 Build & run
Darknet-TESTフォルダの先頭に戻って、カメラを接続し、
make
make run
で実行です。
最初の手順は面倒ですが、2回目からはフォルダ毎コピーすれば、新しいプログラムが作成できます。まさかこれだけでハイスピードYOLOが動くとは思いませんでした。
認識部分は別スレッドで動かしているので、画像そのもののスピードは落ちず、OF上60fpsを維持しています(画像スピードはカメラに依存)。認識スピードは前回の記事に書いたモノとほぼ同じです。つまり実用レベルのスピードでした!!。
Return to the beginning of the Darknet-TEST folder, connect the camera,
make
make run
It is executed in.
The first step is troublesome, but from the second time you can copy new folders and create new programs. I did not think that high speed YOLO would work just by this.
Since the recognition part is moved by another thread, the speed of the image itself does not decrease and it keeps 60 fps on OF (image speed depends on the camera). The recognition speed is almost the same as the one written in the last article. That was a practical level of speed! ! .
実際にXavierで実行してみると....... Actually running it with Xavier .......
今回はyolov2.weightを使用。yolov2.cfg 中width=608 height=608にした場合。画像は30fpsのままで認識にかかった時間は左下に表示この場合は1/0.069=14.49fps!! We used yolov2.weight this time. When yolov2.cfg width = 608 height = 608. The image remains at 30 fps and the recognition time is displayed in the lower left. In this case 1 / 0.069 = 14.49 fps !!
今回はyolov2.weightを使用。yolov2.cfg 中width=416 height=416にした場合。この場合は1/0.039=25.64 fps!! Tiny-yoloだとここまで認識しません。 We used yolov2.weight this time. When yolov2.cfg width = 416 height = 416. In this case 1 / 0.039 = 25.64 fps !! Tiny-yolo does not recognize so far.
メインスレッドがほぼ60fpsなので認識内容を元にまだまだ別の複雑な処理が可能になります。これはCフレームワークに乗せることの醍醐味ではないでしょうか?OFのほとんどのaddonが実行できることになります。YOLOの学習作業は、過去の記事で試していますがこれは、あくまでも母艦Ubuntuを使った場合です。
Since the main thread is almost 60 fps, another complicated processing can still be performed still more based on the recognition content. Is not this the real pleasure of putting it on the C framework? Most addons of OF can be executed. YOLO's learning work is tried in the past articles, but this is the case when using the mother ship Ubuntu.
これがXavier内で簡単な学習ができるとなると、アマチュアでも同一機種内で、どこでも学習と認識の応用が出来ることになります。また、今回はYOLOの実現だけですが、Darknetにはまだまだ実用的なexampleがたくさんあります。もうワクワクどころじゃ無くなってきました。
では、また.........。
If this makes it easy to learn in Xavier, amateurs will be able to apply learning and recognition anywhere within the same model. Also, this time only YOLO realization, Darknet still has many practical examples. It is no longer a thrilling excuse.
see you..........